This is a construction game that tests the player's brain power and graphic design. Maybe you have played this Poly Bridge 2 game or heard about this Poly Bridge 2 game from your friends, the goal of this game is to build a bridge that can drive a vehicle from A to B within a limited budget using materials. This game is a combination of rich physics principles, if you do not know how to build a bridge to pass, then you can refer to the bridge structure we have given you in previous articles, this time we continue to share with you how to build a solid bridge. So that everyone can become a real bridge builder.
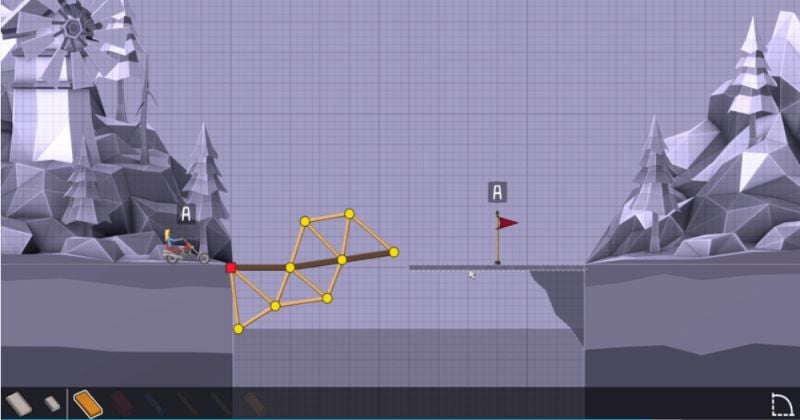
First of all, we will share with you the 14 levels of this Poly Bridge 2 game bridge construction, this one level is called land support, this level gives us a hint is that if there is no red fixed joints, please try to do support with other pairs, then this one level we can make a little different bridge, this time we can build a bridge that can make the car leap out, first need to outline First of all, we need to outline a suitable curve, in the construction of the curve of our curve is able to let the car fly up, and then use the material to pave the road out, when we have paved the curve road, we still use triangle to strengthen, because the triangle is one of the most stable shape, it can make the weight completely distributed on your whole bridge, and will not collapse, when we finish the construction of the triangle above the curve After we finish building the triangle on top of the curve, we need to reinforce the starting position, we need to use the triangle below the starting position to reinforce it, usually, the larger triangle structure is more stable than the smaller triangle structure, this level is equivalent to other more difficult levels is relatively simple, the bridge and the ground of this level is roughly structured as shown in the figure below.
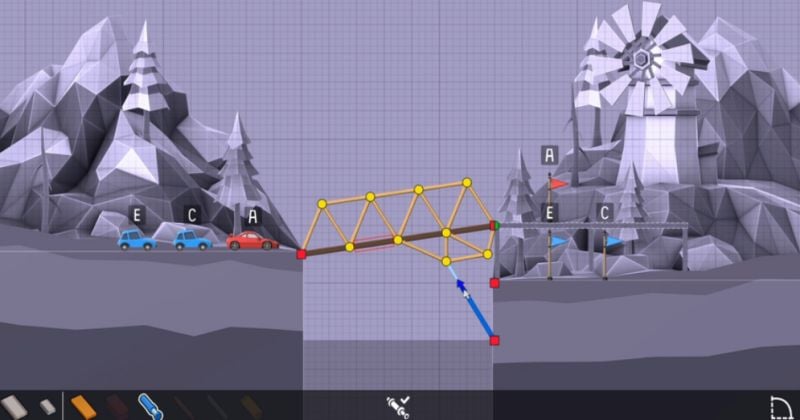
Next, we continue to share with you how to build a solid bridge at level 15, which gives the level called hydraulic management, also this level also gives us a small hint to tell us to activate the hydraulic lever when using the hydraulic controller to set up, this one level is a little more difficult than level 14, because there are many players do not know how to set up the hydraulic controller, first, we first observe this level requires us to put three cars All through, but need A car to drive to the opposite side of the upper A point parking, when A car through the bridge needs to move to the bottom to let C and E car through, we still use the triangle method to build, we first use the lower right corner of the "shape" props to connect the shape of the ground will be the highest point across the river connection, and then use materials Next we need to set a separation point at the highest point opposite the car, and then still need to reinforce the bridge, we still use the same triangular method, when the reinforcement is complete we need to start adding hydraulic rods, we add hydraulic rods from the location of the bottom of the red dot, and adjust the contraction of the hydraulic rods to 30 percent, and then switch to the hydraulic controller, first by The order is A car, A car through the hydraulic rod before the start of work, when the hydraulic rod after working down to the middle point of the position after the C car and E car through, which means that we build the bridge can let us pass this level, then the bridge construction and hydraulic rod structure of this level is shown below.
Once you have built the bridge structure for each level, you can always pass the level by clicking on the "?" icon displayed in the toolbar at the top of your screen. icon in the toolbar at the top of your screen to view bridge hints and game mechanics.